BrightForms on iOS
Contents Hide
- Getting Started with BrightForms on iOS
- Development for iOS BrightForms
- BrightForms File Sharing
- Running BrightForms on iOS
- iOS Screen Dimensions
- Multiple Device Layouts
- Scaled Layouts
- Orientation Locking
- Panning Within Forms
- Controls and the iOS Keyboard
- Tabbed Forms in iOS
- Location Services and the GPS
- File Document Viewer
- Launching Applications via URL
- Barcode Scanning
- Editing Control Detail
- Resizing ListViews
- Scribble Panning
 Please note that BrightForms on iOS is only compatible with BrightServer
6 or above. Previous versions of BrightServer are not supported.
Please note that BrightForms on iOS is only compatible with BrightServer
6 or above. Previous versions of BrightServer are not supported.
Getting Started with BrightForms on iOS
Installation via App Store
BrightForms on iOS is available to download and install from the iTunes store, via the following link:
https://itunes.apple.com/us/app/brightforms/id647094341?mt=8
It may alternatively be found by searching for 'BrightForms' in the App Store's search box, then installed by tapping the 'INSTALL' button.


Once installed BrightForms will appear in the device's set of applications. Tapping on this icon will open the BrightForms application.

Initialisation and Settings
Upon opening BrightForms for the first time in iOS, the following screen will be shown:


On this screen, server details, user name and password to log in to a BrightServer instance may be entered without having to go through the full settings dialog.
Changing any of these fields will alter the project's settings configuration to match. The full settings dialog may also be accessed from this screen via the 'Settings' button, or via the 'Help > Settings' menu. If the device is enrolled for Mobile Device Management (MDM), these settings may also be configured via an MDM server. For more information, please refer to the Support for Managed App Configuration topic.
Once configured, the 'Activate' button may be tapped to synchronise to the specified BrightServer instance. On success, BrightForms will exit, then automatically load the project deployed for the user.
Uninstallation
Long tapping any app icon on the home screen will initiate the uninstall application process in iOS (signified by icon jiggling). In this state, tap the top left 'x' button for BrightForms to uninstall it from the device. A dialog to confirm the command will appear, and if proceeded, BrightForms and all its data will be deleted from the device.

Development for iOS BrightForms
iOS applications run in their own sandbox, and the iOS platform does not allow direct file copying to iOS devices. Therefore running BSP projects directly from BrightBuilder by using the toolbar 'Execute' (F6) button is not possible.
After BrightForms is installed, applications which are to run in iOS must be deployed onto a BrightServer instance and synchronised to the device via Application Distribution. After this process, BrightForms will load the application on restart.
Please note, as with any application distribution process, any tables not matching the schema deployed will be dropped, or dropped and recreated on the device accordingly.
Similarly, tracing is typically performed remotely from the device to BrightServer, with any logs from the device requiring to be synchronised to the server to be viewed via BrightServer's Client Logs functionality. If the device is a local development device, then using iTunes file sharing feature (see the sections below), the log files can be copied to the development machine for inspection. Note that these log files may be cleared within BrightForms via the 'Delete all trace log files' button in the 'Settings > System' menu.

BrightForms File Sharing
BrightForms' files, including logs, may be accessed from the iOS device using the iOS File Sharing feature. This may be achieved by connecting the device to the a host machine via USB cable, then viewing the device in iTunes. BrightForms' files may then be accessed by scrolling down to the the 'File Sharing' interface under the Apps tab of the device.

Using this dialog, files may be added into the BrightForms iOS directory either by dragging and dropping files into the list or by using the 'Add...' button.
Similarly, files may be exported from this directory by using the 'Save to...' button, or by dragging and dropping them out of the iTunes window to their destination. Folders and their entire contents may only be exported via the 'Save to...' button. In this way, an application's log directory may be downloaded onto a host computer without using BrightBuilder.
Finally, files may be removed from the device via selecting a row and pressing the 'delete' button on the keyboard. Please note, it is not recommended to delete or replace files located in this folder unless absolutely necessary, as it may cause instability in BiOS and require it to reinstalled.
Running BrightForms on iOS
When BrightForms runs on an iOS device, if it is no longer the foreground application/process, its operations will be suspended. This may happen for example, via the Home button or multitasking functionality in iOS.
If BrightForms is re-opened and is in the foreground again, it will resume from its suspended state. However, if BrightForms is in the background and is forced closed via iOS multitasking or system termination, it will not resume back to this state.
Each form in BrightForms on iOS will typically have a Close button - marked as 'Done' in the top left of its title. This button is used to close the currently active form, and return to its parent, triggering any OnClose expressions the form may have defined. The exception to this is the project's main form, which has no parent and therefore no Done (i.e. close) button.
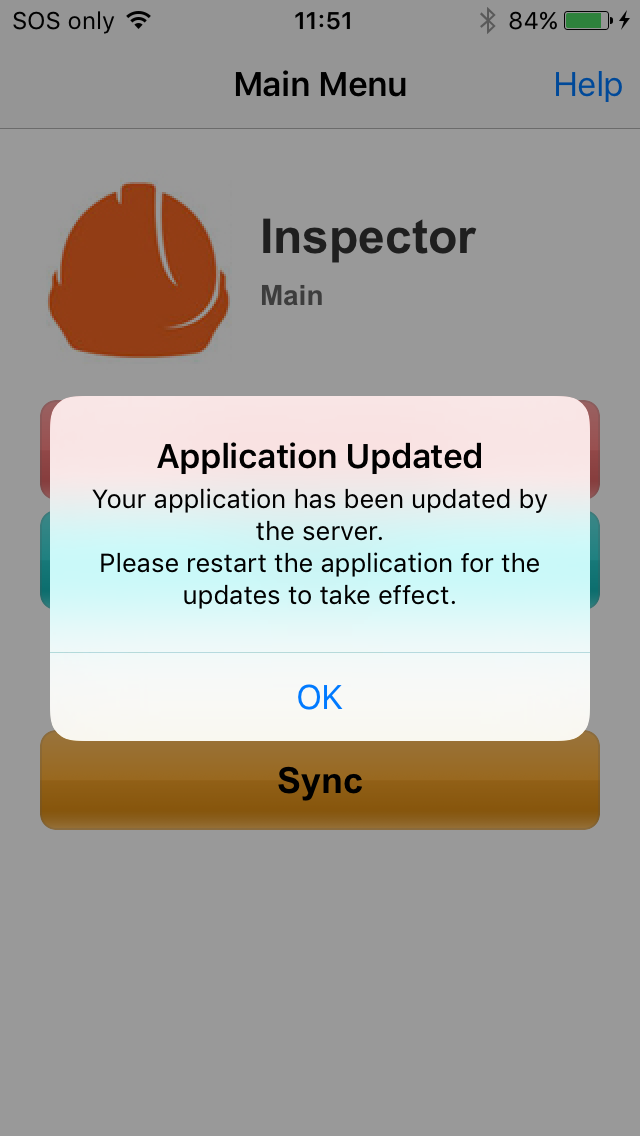
On successful application distribution, a 'Reload' icon will display in the place of the close button if the form is the projects first or 'main' form. Tapping this button will restart BrightForms with the new application retrieved from the server.


On every form, there also exists a 'Help' button, located at the top right of the screen. Tapping on this button will expand BrightForms' Help menu, which will display the BrightForms Help Menu Commands. It will also display any user defined menus if they exist for the currently active form.

iOS Screen Dimensions
Dimensions for iOS layouts are managed in logical pixels. The dimensions for each device (portrait) are as follows:
| Device | Height | Width |
| iPhone4/iPod Touch | 480 | 320 |
| iPhone5/6/6+ | 568 | 320 |
| iPad2/3/4 | 1024 | 768 |
| iPadMini | 1024 | 768 |
Please also keep in mind the following heights for BrightForms standard UI features when developing applications for iOS devices.
Status Bar: 20 pixels
Tabs: 48 pixels
Toolbar: 45 pixels
Cursor Bar: 40 pixels (iPhone/iPod Touch), 50 pixels (iPad)
Multiple Device Layouts
Layouts may be defined for a project such that each device's screen space may be optimised, while retaining application logic in the project. When running, the application will detect the closest aspect to the device's dimensions, then render it for the end user. Aspects may also be defined for each device in both portrait and landscape orientations. This may be configured by defining Form Aspects in the project in BrightBuilder, then applying them to the project's forms accordingly.
For example, when developing project to be used on iPhone and iPad devices, the base layout may be defined for the iPhone, but then iPad layouts may be defined by applying and modifying an iPad aspect for the form.

For each form, the iPad layout may then be changed to accommodate the larger screen size when run on the device.


For more information on this please refer to the BrightBuilder > Form Aspects chapter, or the Dynamic Layouts in BrightBuilder using Aspects tutorial.
Scaled Layouts
Applications designed for other platforms may be up or upscaled via specifying a scaled layout.
These settings may be configured via the Help > System menu, under the 'Scaling' heading. By default, BrightForms is installed with these values at '1', such that each pixel unit specified in BrightBuilder matches the device's logical pixels. This may be increased or decreased via enabling control or font scaling, and then specifying a scaling factor. The effect of this will take place for forms which subsequently open in the project. This feature may become handy, for instance, when running applications designed for Windows Mobile devices on an iOS device.
Typically, the scaling factor specified should be the same for both font and control scaling as the iOS platform automatically handles font scaling accordingly.

Orientation Locking
By default, changes to the orientation of iOS devices will trigger aspect reassessment and orientation change events in BrightForms.
If an application is to be run with a set aspect in iOS without these changes based on orientation, the 'Screen Orientation' feature in BrightForms' Settings > System may be used. Here, the default behaviour may be changed to ensure that BrightForms always considers the device to be in Portrait or Landscape modes, ignoring any orientation changes made on the device. If the selection for this option is not already the current orientation, it will be rendered upon closing the settings dialog.
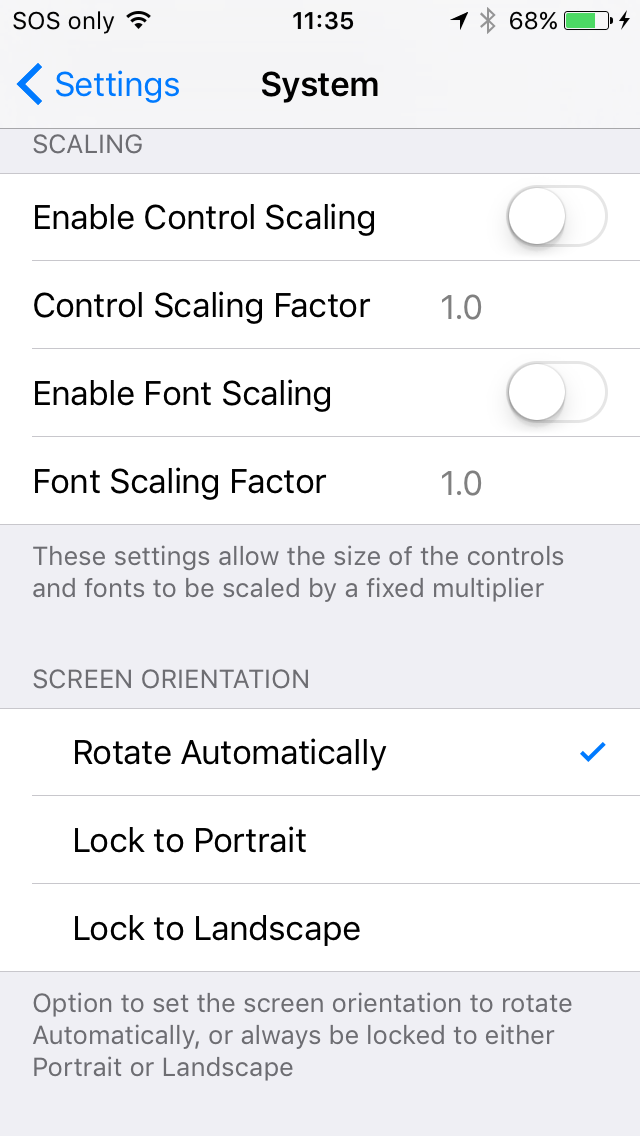
This lock does not apply to BrightForms' settings screens, which will always display based on the orientation of the device.
Panning Within Forms
Forms which exceed the device's viewing dimensions may be panned through the form vertically or horizontally by tapping a non-editable area of the form, then scrolling the content in the direction of finger movement. This would typically happen when the form size exceeds the device's screen size, or when entering text due to the keyboard appearing on the screen.
When scrolling, a scroll bar will be viewable on the right or bottom of the form, indicating the part of the form viewed.


If gestures are activated on a form which needs to be panned, a longer tap is required initially, such that the iOS gesture does not register.
Controls and the iOS Keyboard
Selecting an edit control or other area requiring user input, the iOS keyboard will display at the bottom of the screen for input. While open, the keyboard will always be displayed on the form, with the form's content displayed and scrollable above the keyboard.

Due to the vertical space of the keyboard, the form may require vertical panning in this state.
Once completed, the user may tap a non-editable area of the form to hide the keyboard. Alternatively, the upper BrightForms toolbar may be tapped for the same effect. On the iPad, the dedicated 'Hide Keyboard' button may also be used.
Tabbed Forms in iOS
As with Windows Mobile and Android implementations, forms will render tabs at the bottom of the screen for users to tap.

However, if the length of the tabs exceed the width of the form, the tabbed section of the form will display a cropped view and/or subset of the total tabs. This area may be swiped left and right to access the other tabs in the form.

After scrolling, tabs may be selected as usual with a single tap by the user.
Location Services and the GPS
The first time GPS.OpenIntermediate() is called within BrightForms, a dialog box will appear to the user prompting access to the device's location. Tapping 'OK', will give BrightForms the necessary permissions to utilise the GPS in BSP projects. Tapping 'Don't Allow' will refuse access, and if called again, the opening of the GPS will fail, with no dialog displayed.
Initially, the GPS.OpenIntermediate() return code will be 11315 as the location services dialog displays. After BrightForms is authorised, the return code will be 0 when the method is subsequently called. If not authorised, the GPS.OpenIntermediate() method will continue to return 11315 as its error code.

The state of BrightForms' permissions may be found under the 'Settings > Privacy > Location Services' menu in iOS, once BrightForms displays the location dialog. Please note, this menu is the only way to activate/de-activate location services once the location dialog in BrightForms is displayed.

With location services for BrightForms activated, if the GPS is
successfully opened and running in the application, the ![]() icon will
be located in the iOS status bar, to the left of the battery icon.
icon will
be located in the iOS status bar, to the left of the battery icon.

File Document Viewer
Files such as PDFs, images or Microsoft Office documents stored locally on devices may be opened on the device using the Form.ViewDocument() method.
For example, the following code would get an the file path of an ExternalBlob in a listview, and attempt to open it:
local.vExtBlobFile = listview1.GetCurrentRowColumnValue("FILE_PATH");
Form.ViewDocument(local.vExtBlobFile);
Calling this method with a local file will proceed to open the file in iOS's document viewer, which will display the file based on its extension or MIME type. From this screen, the file may be shared or opened using other applications via the top right share button. The applications which may be used are also determined by the file's MIME type.
If no associated format can be found, the document viewer will display the file itself, which may still be shared.


Once viewing complete, the Done button may be tapped to return to BrightForms.
Launching Applications via URL
As of BrightForms 8.1.0, BrightForms is able to launch URLs, which may in turn launch other programs on the device with the System object's RunProgram() method. For example, the maps application on the device may be invoked to open using 'http://maps.apple.com/', while specifying a URL which is not associated with an application will open the device's browser application. This URL value is specified as the first parameter of the method; the second string parameter is not used.
For example, the maps application may be invoked by the following call:
System.RunProgram("http://maps.apple.com/?q=106%20Derby%20Street%20Silverwater%20NSW%20Australia","")
While a browser will be opened with the following:
System.RunProgram("http://www.google.com/","")
A list of supported URL schemas are as follows:
Web Links (http address)
Mail (mailto:)
Phone (tel:)
Facetime (facetime:)
SMS (sms:)
Maps (http maps.apple.com address)
iTunes (http address)
YouTube (http address)
 For
more information on the URL calling schema in iOS, please refer
to the following documentation: https://developer.apple.com/library/ios/featuredarticles/iPhoneURLScheme_Reference/Introduction/Introduction.html
For
more information on the URL calling schema in iOS, please refer
to the following documentation: https://developer.apple.com/library/ios/featuredarticles/iPhoneURLScheme_Reference/Introduction/Introduction.html
Barcode Scanning
Barcode scanning in iOS is performed using the device's camera. When the Scanner.Scan() method is called, the camera's output will load on the device's screen for the user. Both 1D and 2D barcodes may be scanned.
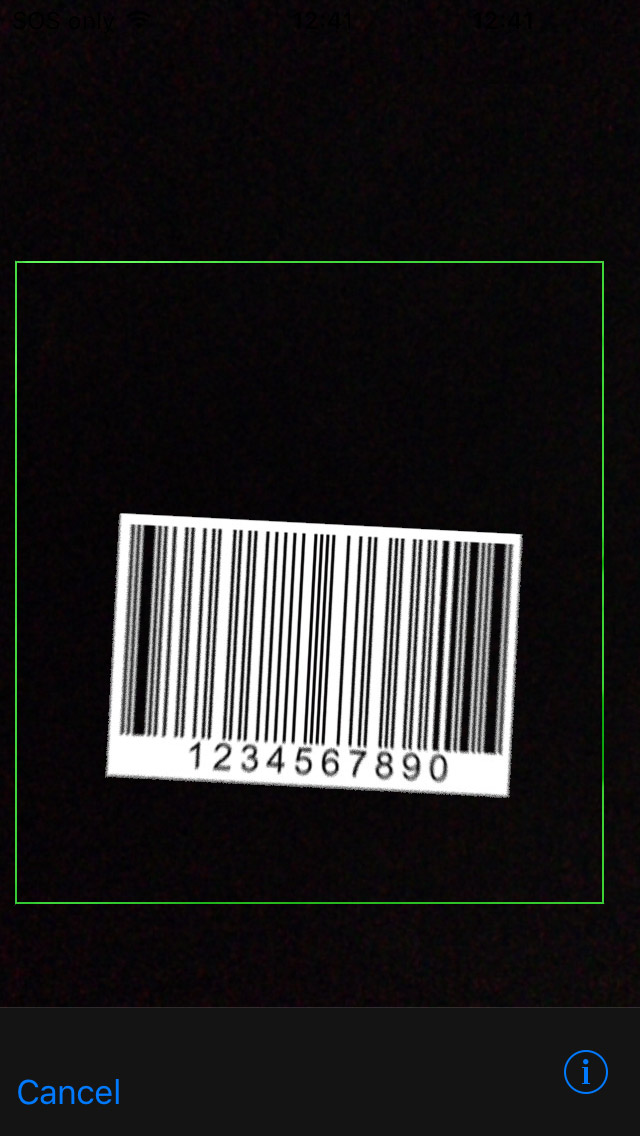
BrightForms will stay in this view until a barcode is retrieved, or the 'Cancel' button is tapped, in which case there will be no barcode recorded. If there is a barcode visible on the screen, it will be highlighted by a green area prior to being captured. Only the first detected, single barcode may be retrieved by each Scanner.Scan() call. Once captured, the camera preview will close, and the calling form returned to. Any expressions assigned to Action - Scan Complete will then run.
As with Windows Mobile, the scanner object must be initialised with Scanner.Open() prior to the scanning process. Similarly, the Scanner.EnableBeeper() controlling the audible beep on scan success should be set before this method is called. Scanner.Close() should also be called once scanner use is no longer required in the user's workflow.
The barcode scanning processing in iOS BrightForms relies heavily on the camera being able to focus and get a clear image of the barcodes scanned. For this reason, devices such as iPad2 and iPod Touch 4th Generation or lower are not recommended for barcode scanning, due to their camera limitations.
Editing Control Detail
In BrightForms on iOS, controls which require user selection are
marked with the iOS 'detail editor icon', ![]() . This
icon is used for the combo box and date time controls, and is situation
to the right of their bounds. Tapping on this icon will display a
new view to the user, allowing them to make a selection.
. This
icon is used for the combo box and date time controls, and is situation
to the right of their bounds. Tapping on this icon will display a
new view to the user, allowing them to make a selection.
For example, for the combo box control, clicking within a combo box's editable area will bring up the iOS keyboard for input but it's detail may also be populated via drop down options via the 'detail editor icon' to the right on the control. If the combo box is specified to be drop down only, tapping outside of this region in the control will have no effect.

The drop down component will display all items on the screen for the user to select, with the current item highlighted within the list. Tapping any item in the list will both select the item for the control, and close the selection screen. Alternatively the top left 'Cancel' button may be used to cancel the selection, and return to the form.


After the user selects an item, the combo box control is updated. The selection is to be cancelled, the user may tap the 'Cancel' button to return to the form.

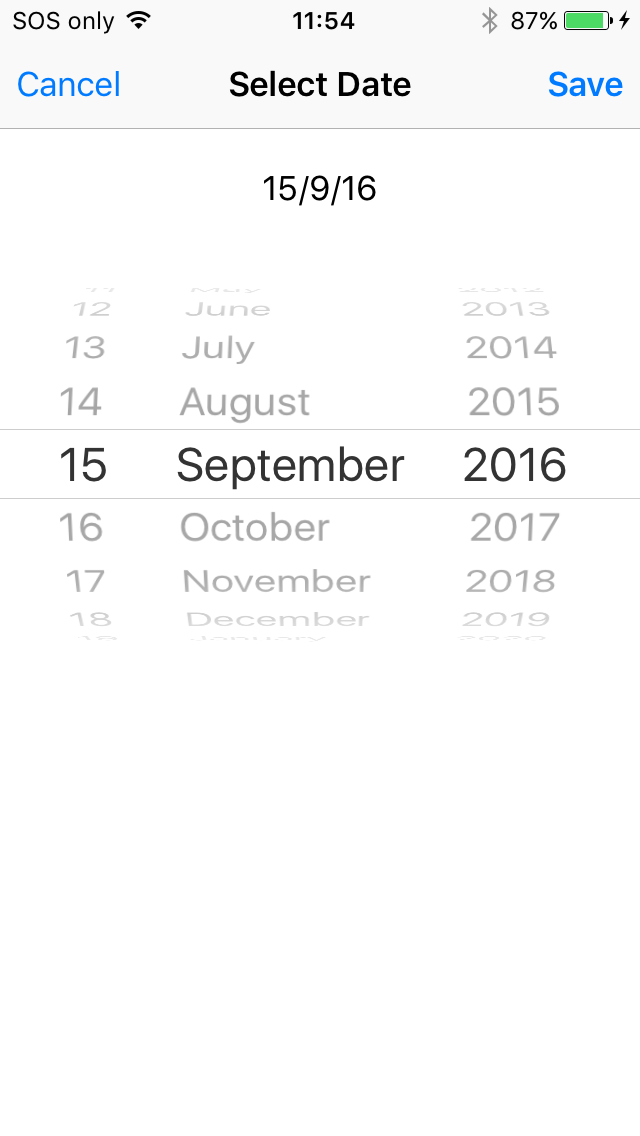
Similar to the combo box, the date time control allows the user to select a date via the iOS picker, with the current date highlighted in blue. Tapping on the top left 'Cancel' will discard any changes, while 'Save' will return to the form with the selected value.
This icon is also used in the listview Data Grid for button controls, which when tapped, will run the associated expression or open the defined form for the cell.
Resizing ListViews
Listview columns may be adjusted in iOS by long tapping the header of the column to edit, then making changes to the width as necessary:


When the header is selected and held, it will appear highlighted with its separator marked. Depending on if the left or right 50% of the header is tapped, its left or right separator will be highlighted. This signals that the column widths may be adjusted left or right.
Once adjusted, and the input is released from the screen, and the listview will save the new width changes for future sessions.
Scribble Panning
Scribbles which are loaded with images larger than their bounds may have their contents panned by the user if their 'Has Scroll Bars' property is set to 'true'.
In iOS, this is handled by having scribbles be in two different states - mark up mode and panning mode. In mark up mode, any user tap and movement within the scribble's bounds will be captured and drawn on the control. In panning mode, the scribble contents will move instead of drawing user input, and display scrollbars with the panning movement.
Toggling between the two modes may be achieved by long tapping the control. A scribble which is in panning mode will display a red border reflecting this state - otherwise the default scribble border property will display. Scribble controls will load in mark up mode by default.


Please note, if the image size loaded into the control is equal to or smaller than the scribble dimensions, panning mode will not be available for the control. If in panning mode when a smaller image is loaded, the scribble control will revert to mark up mode.