User Configuration
Contents Hide
This chapter discusses how the users accounts and groups are managed by using the Configuration Users node. It will also discuss how to manage application distribution and server configuration updates by the BrightBuilder interface.
Users Panel
Access to BrightServer and the backend systems through BrightServer is only allowed for when a user has been successfully authenticated with a user name and password. Without the required authentication details, BrightServer does not permit any access to backend data. These credentials are verified as part of login process through either HTTP basic authentication or the form authentication mechanism provided by BrightServer.
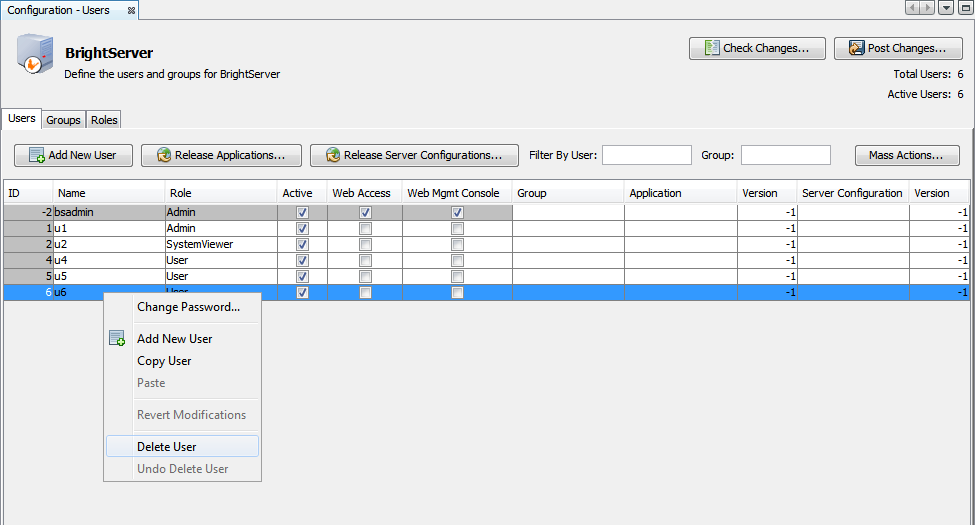
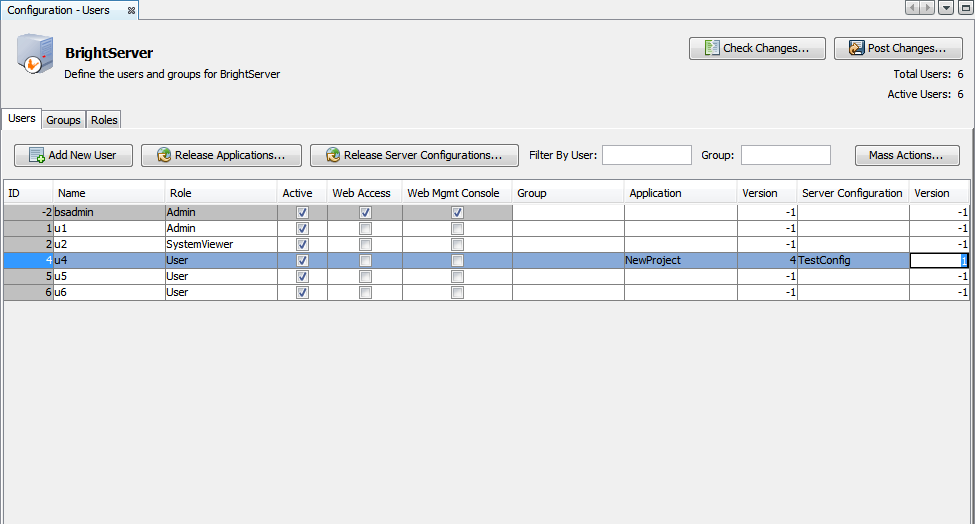
User accounts are managed via the Users panel. To open this configuration panel, either double click on the “Users” project element or mouse right click to display the pop up menu to open and select Open menu option.

Each user account consists of the following details:
User Id : This is a read only field of which value is assigned by BrightBuilder. This field is required by the system for internal use. This field does not have to be entered into the BrightForms User settings. The User ID field in BrightForms settings is unrelated to this field.
Name : This is the unique user name that identifies each user connecting to the server. This is the field that needs to be entered into the BrightForms User settings “User Name” field.
Password : This is the password field that is required together with the user name to authenticate the user. This is the field that needs to be entered into the BrightForms User settings “Password” field. Note that user passwords are stored as encrypted MD5 hash keys in the systems for security purposes (i.e. they are not stored as clear texts in the system).
Role : This field sets the user's role, which determines what server information they may view or edit when on the server when logged in via BrightBuilder. See User Roles.
Active : This field determines whether the user account is active or not. BrightBuilder will export only active user accounts when the project is run or it is exported.
Web Access : This setting will allow the user to log in via BrightServer Data Gateway Login page, and run their assigned application via BrightServer's web interface. Each user performing this requires a web license. For more information on these licenses, refer to the Licenced Web Users section of this document.
Web Management Console : This setting will allow the user to access BrightServer management console for monitoring and configuration purposes. The management console is a web application accessed via the same BrightWeb login screen. For users to access to the management console they must also have the Web Access, and no application has been assigned to the user in question. If the user has web access and has been assigned an application, regardless of the value of this property, the user will be presented with the assigned application. This means the assigned application has takes precedence over this property's value.
Group : Each user may belong to a Group. Groups are a simple way to categorise each user and are useful when releasing applications to different users. See Adding a new group.
Application / Version : These fields contain the name of the application, and the version of it the user device needs to have on their device. When the device connects to the server with the user account details, before any synchronisation rules take place, BrightServer checks these fields. If BrightForms' project and version differs from the values specified in these fields, BrightForms will download the specified version from the Applications repository. This process is known as 'Application Distribution'. For more information, please refer to the Project Deployment chapter of this document.
If there is no application set for the user, the application will synchronise based on the server configuration for the user only, omitting application distribution. This is useful when debugging or executing projects via BrightBuilder's execute commands.
Server Configuration / Version : Defines which server configuration is used for user synchronisation to/from the server, with a name and number. These values are used to look up a configuration in the Server Configuration repository, and have the device sync based on the definition retrieved. If no server configuration name is specified, or if it, combined with the version number is invalid, the server's default configuration will be used. For more information, please refer to the BrightServer Project Deployment chapter of this document.
The Users panel is shown below:

The user and group list may be sorted at any time by clicking on the heading with which the list is to be sorted.
 In addition to the user accounts configured in the user panel,
BrightServer also comes pre-configured with a default "bsadmin"
user account. This is an admin account which cannot be deleted
or deactivated, nor may it have it's user role modified. However
it may be edited using the Runtime Server configuration as detailed
in Server Configuration.
In addition to the user accounts configured in the user panel,
BrightServer also comes pre-configured with a default "bsadmin"
user account. This is an admin account which cannot be deleted
or deactivated, nor may it have it's user role modified. However
it may be edited using the Runtime Server configuration as detailed
in Server Configuration.
Locating Users
The order of the users appearing in the list of users once the configuration is may be sorted by column in both ascending and descending order.
The 'Filter By User' and 'Group' text input fields may also be used to narrow down the list of displayed users. The 'User' and 'Group' filters are logically ANDed when filtering the users in the list. Typing a user string and/or a group string value in these fields will filter the returned user records which contain the filter strings. These filters are also included in any form which involves the sorting and editing of users.
When the filters are active, deleting the strings entered in the filter controls will display all users once more.
Adding a new User
To define a new user account, right click on the user list to bring the pop up menu and click on Add New User option. This will create a new account entry with the default values, and is signified by green highlighting of the row in the table. It will have the next automatically generated user name and password already populated. By default, the user account is active, without web access and have the 'user' role. These default settings may then be modified and will take effect once the configuration is uploaded to the server.
Alternatively, this may also be performed using the 'Add New User' button in the panel.


Deleting a User
To delete a user account, right-click the user account and use the same pop menu’s “Delete User” option to delete a user account that is not required anymore. The row will be marked red, signifying the user's deletion once the configuration is uploaded to the server.
An alternative to deletion is de-activation. You can de-active the user account by un-checking the Active checkbox for the user account entry. By doing so, if the user needs to be reactivated again, you will not have to recreate the user account from scratch.
User Passwords
By default, a user's password is the same as their user name on creation. To change a single user's password, perform the following:
To change a single user's password, highlight the user and right click, opening a context menu for the user.
The option 'Change Password ...' will appear in this menu.

Selecting it will open the 'Change Password' dialog.
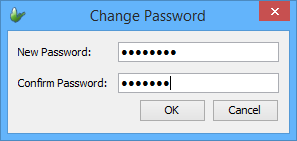
Type in the new password and retype it to confirm, then tap OK. The password will be modified for the user.
For mass changes to users and user passwords, this method is not advised. System administrators are advised to utilise the CSV File Import procedure for such cases.
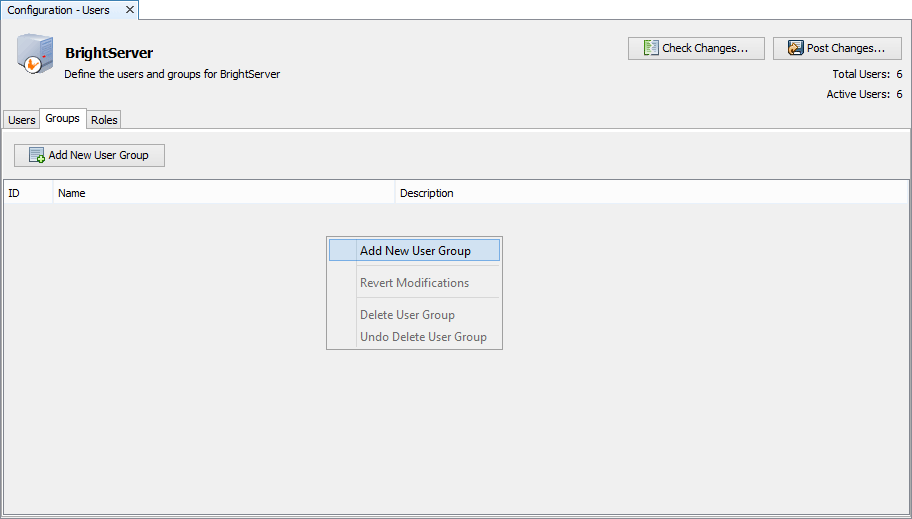
Add a new Group
To define a new group, go to the Group tab of the User panel and right click on the group list to bring the pop up menu and click on "Add New User Group" option. This will create a new group entry with the default values. It will have the next automatically generated group name. Change the fields as necessary to modify the group details.
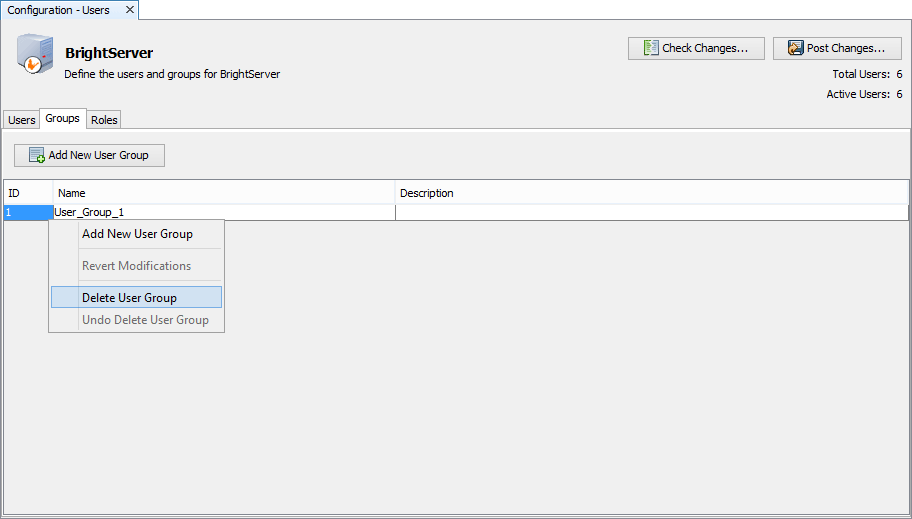
Delete a Group
To delete a group, right-click the group and use the same pop menu’s “Delete User Group” option to delete the group
Application Release
There are two possible ways to release an application to the users.
Manually entering the Application Name and Version Number for each user account.
Using the Release Applications to Multiple Users option. These options will be discussed in detail.
ASSUMPTIONS: A BSP project has already been deployed to the
Application
Distribution - Deployment Directory that you have setup in
the Server Element. Read more on Project
Deployment and Application
Distribution.
 These methods will also allow you to remove an application release
for the users by simply entering or selecting no project and zero
(0) version number.
These methods will also allow you to remove an application release
for the users by simply entering or selecting no project and zero
(0) version number.
Releasing an application per user account row
Each User's Application name and Version number can be manually configured.
To modify the Application name or Version number, simply double-click the column field and enter the application number or version number as shown below.
This method is useful if you are managing a small number of
users or simply want to release an application to a specific
user. You can also use this method to remove an application
release for each user.
Release Applications/Configurations to Multiple Users
If the mobile solution has a considerable number of users for which an application or server configuration will be released to, then use the 'Release Applications ...' or 'Release Server Configurations ...' dialogs may be used instead of manually entering the application or server configuration details for every user account.
For the releasing of applications, before using this method, if using an older version of BrightServer, ensure that you have entered the BrightServer Deployment Directory in the Server panel's Application Distribution - Deployment Directory. BrightServer needs this directory to discover deployed applications which can be released to users.
Use this option by clicking on the "Release Applications ..." button for applications, or the "Release Server Configurations ..." button for server configurations on the Users panel. This will open the Release Applications dialog as shown below.
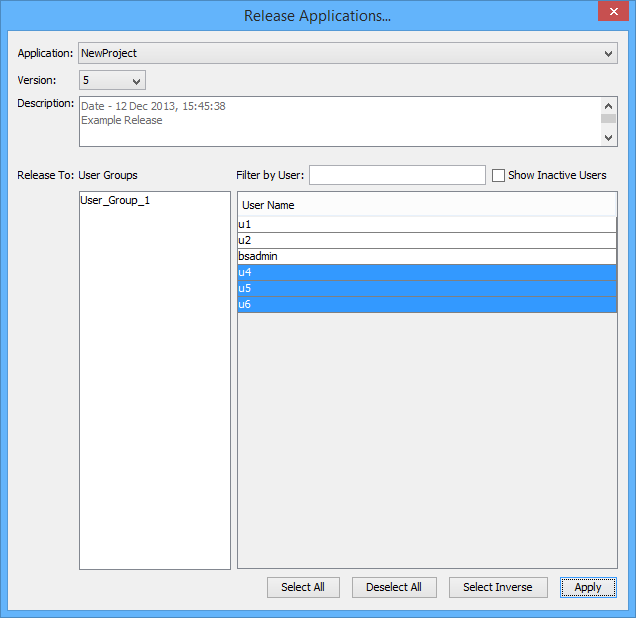
To release of either application or server configuration, perform the steps below. At any point in this procedure, users in the dialog may be selected, either by selecting the group in the 'User Groups' list, selecting blocks of users with the (Shift) key, or by clicking on individual users while holding down the control (Ctrl) key.
The Application drop down list will display all the projects available from the deployment directory for selection. This list is sorted in alphabetical order.
Once an application has been selected, the Version drop down list is populated with the available versions for the project selected. This list is in descending order and shows you the latest version first.
When the project and a version is selected, the read-only Description field will be populated with the release's deployment date and description (if applicable) for confirmation.
Click the Apply button to set the project and release to the selected users in the list. Upon exiting the dialog, the users panel will update, applying the application or configuration name and version number to the users in the list.
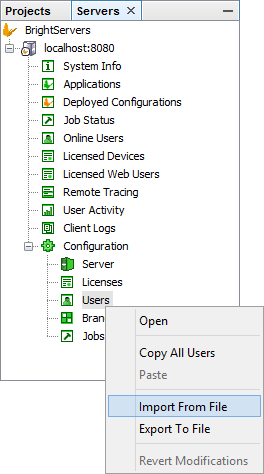
CSV File Import/Export
Lists of users may be uploaded onto the server, once the server's the user configuration is downloaded. This is achieved by right clicking the 'Users' configuration group and then tapping on 'Import From File'. The file to upload may then be specified by a file open dialog box which will open.
Once selected, the file will then be parsed in the following CSV format:
username, group, password
All values defined after the password will be ignored. For example, the following lines in the CSV file:
username, User_Group_1, password, ignored-string
thunder,, tiger
falcon,, bird
single
will create 'username', 'thunder', and 'falcon' accounts and matching passwords to upload onto the server, all with default account permissions. If these users already exist in the users panel, they will not be re-added to the server, however, if their password is different, it will be changed to match the value in the CSV.
The 'username' user will be created, assigned to the 'User_Group_1' group. Specifying empty string for the group value will add the users unassigned into the users panel. If any group specified for any user does not exist in the system, the import will fail.
If there is no password specified for a user, the username value will be used as the password on import. Therefore, in the example above, the user 'single' will be assigned the password 'single' on import.
Note:
Any fields with the ',' character must be quoted in double quotes
- for example "cou,g,ar" will be the CSV value of the
password 'cou,g,ar' , and any incorrect parsing/file format will
abort the operation.
The 'Export To File' option from the same context menu may also be used to download a list of users in text format. This will simply list each username on the server with group (if applicable), to a file specified by the file save dialog. Each username will be listed on a new line in the text file. For example, exporting the data imported by the file above, a file containing the following will be produced:
username, User_Group_1
thunder,
falcon,
single,
User Mass Actions
Also located in the user panel is the 'Mass Actions' button, which will open a dialog of the same name. This dialog allows server administrators to edit the configuration of several users in the users panel, without having to modify each user individually.

Performing mass actions such as these are useful for periods where server downtime or maintenance is required, as there may be many uses active in the window, but incorrect or partial data present. As an administrator, you would want to disable all users during the downtime to avoid incorrect syncs during this time. The mass actions feature of BrightBuilder makes actions across all users such as this a quick and simple process.
Once tapped in the users panel, the dialog appears allowing multiple users to be selected (with ctrl+click, shift-click), an optional group, along with an action from a drop down list as follows:
Activate Users - If a user's activate flag is false, set to true. Nothing if already set to true.
Deactivate Users - If a user's activate flag is true, set to false. Nothing if already set to false.
Add Web Access - Enables web access via licenses to the selected users.
Remove Web Access - Will set web access to false for all selected users.
Add Users to Group (uses panel to the right) - Register the selected users to the selected group to the right.
Revert Modifications - Revert selected users' settings to when the server config was last opened.
Delete Users - Mark the users selected to be deleted, removes newly created users since config download.
Undo Delete Users - Unmark selected users for deletion, only works if user is set to be deleted since config download.
Once users and an action have been selected, clicking the 'Apply' button will quit the dialog, and the changes from the command will be displayed in the users panel. The configuration may then be uploaded to the server for changes to take effect.