
Contents Hide
This section covers all topics related to installing the Bright Software products.
For Windows installation, run the executable installation file BrightBuilder Setup to start the installation wizard.
For installation on other platforms, or installing multiple versions of BrightBuilder, perform the following:
Install Java 2 Software Development Kit (J2SDK) Release 1.6.0.
Extract BrightBuilder files. Extract all files contained in BrightBuilder.zip to a local directory, taking care to create a suitable installation directory like C:\BrightBuilder.
From the installation directory, open the bin subdirectory i.e. C:\BrightBuilder\bin. Locate the executable file, brightbuilder.exe (or brightbuilder64.exe), which runs BrightBuilder. A shortcut to this file may be created, if necessary.
If opening and modifying very large projects, BrightBuilder may need to have its maximum heap size increased as to not run out of memory. To do this, locate the brightbuilder.conf file in BrightBuilder's 'conf' directory, and change the '-J-Xmx' flag - e.g. '-J-Xmx1024m' (1GB) before starting BrightBuilder. For machines which are running the 64-bit version of BrightBuilder, provided the memory is available, figures such as '-J-Xmx4096m' (4GB) may be specified.
This larger memory allocation will be in effect when BrightBuilder next opens.
BrightForms is provided on several different platforms:
Run BrightForms Setup to start the installation wizard that will guide you through the rest of the installation.
BrightForms is available to download and install freely via Google Play App Marketplace. To do this, perform the following steps:
Locate the 'Play Store' application on the device (previously known as "Android Market".

Once the Play Store application has been loaded, search for 'BrightForms' in the search bar. BrightForms will appear in the results for 'Apps'.

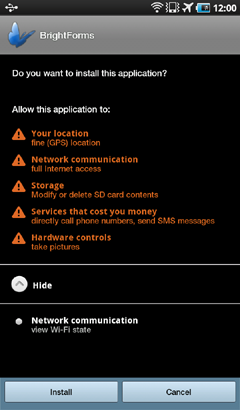
Tap on the result to enter BrightForms' application overview page. Tapping 'Install' will display the necessary permissions BrightForms needs to run on the device. Accepting these will install BrightForms to use on the device.


To install BrightForms on an Android device via APK package:
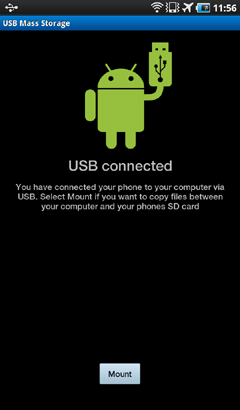
Set up the device's USB file transfer mode.
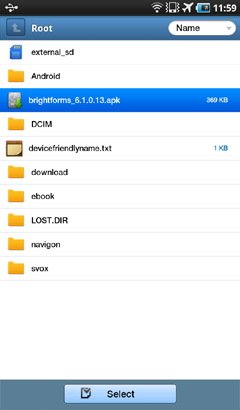
Copy the BrightForms Android Package (APK) file to the device.
In the device's file explorer, locate and execute the APK by tapping on it.
Follow the on screen instructions to complete the installation to the device.
Installation of BrightForms on Android OS Symbol devices must be performed via the specific Symbol APK from the Downloads page of the BrightXpress website.
Before installing this APK, the device must be configured with the following pre-installation, otherwise the installation procedure may not succeed:
BrightForms on iOS is available to download and install from the iTunes store, via the following link:
https://itunes.apple.com/us/app/brightforms/id647094341?mt=8
It may alternatively be found by searching for 'BrightForms' in the App Store's search box, then installed by tapping the 'INSTALL' button.


Once installed BrightForms will appear in the device's set of applications. Tapping on this icon will open the BrightForms application.

BrightForms on Windows Phone or Windows Store is available to download and install from the following link:
Windows Phone: http://www.windowsphone.com/s?appid=ad6caf8d-f1fb-4b8a-a2fa-97a3d576a9f9
Windows Store App: http://apps.microsoft.com/windows/en-au/app/615ae349-215a-409f-9dc3-1b68857facab
It may alternatively be found by searching for 'BrightForms' in the Store's search box, then installed by tapping the 'install' button, accepting any permissions prompted.


Once installed, a new BrightForms tile will appear in the device's start menu under 'All Apps' for Windows Store App devices, or app list. Tapping on the live tile will start BrightForms. This tile may be pinned to any device's start menu by long tapping the tile, then selecting 'Pin to Start'.
BrightServer may be distributed via Windows Installable exe file, or via zip/tar.gz. Setting up a BrightServer instance in this way will have it run on the default ports (HTTP: 8080, HTTPS: 8443, Remote: 12921) until changed via BrightBuilder.
Please note that if BrightServer cannot bind to any of the default ports on startup, it will not start, logging the errors in the ./log/ directory of installation.
If multiple instances of BrightServer are required on the same server, and the default ports are currently in use, please refer to the Installing Multiple BrightServer Instances topic of this document.
Installed BrightServer instances may be registered and configured to run as a service in Windows, if not already. For information how to install, modify and/or uninstall this service after BrightServer installation, please refer to Installing BrightServer as a Windows Service for more information.
Finally, running BrightServer instances must be licensed for connected devices to operate outside of demo mode. An overview on licensing BrightServer may be found here.
For Windows installation, run the executable installation file BrightServer Setup to start the installation wizard. There are two available installation executables - one which will install the BrightServer Service automatically (with ".ServiceSetup" suffix), and one without.
Typically, the service setup executable is used, with the other reserved for a customised, manual service installation.
Unzip the tar.gz or zip file containing BrightServer
Copy Java Runtime Executable files into the directory where BrightServer was extracted. Rename the directory 'jre_x.x.x' where 'x.x.x' is the version number - eg. jre_1.7.0
Change the permissions of the run.bat or run.sh scripts if necessary, making them executable.
Run the run.bat or run.sh files if in Windows or Linux respectively, or install as a service on Windows.
For Windows installation, run the executable installation file BrightIntegrator Setup to start the installation wizard.
For installation on other platforms, extract all files contained in BrightIntegrator Zip to a local directory, taking care to create a suitable installation directory such as C:\BrightIntegrator.